
Digital Design Tools for Interior Designers

The Interior Design industry is all about visual beauty. As designers our main goal for ourselves and our clients is to create a beautiful space that elicits emotions, reflects balance in form and color, and expresses a personality. It’s a challenging task for even the most talented of us (which, let’s be honest, is part of why we love doing it).
One of the most challenging parts of our job, however, is sharing our vision with our clients. We know how to layer fabrics and complement colors. We know what furniture pieces will work in the space available and enhance the feel of a room. We even understand how the right lighting can transform a room from blah into stunning. We know all of this. But our clients don’t. It’s our job as Designers to help them understand our vision, and trust us in our confidence to create a beautiful space for them.
There are many ways that Interior Designers can convey their vision to their clients. We use Mood Boards & Concept Boards, real life fabric and finish samples, sketches and drawing. And recently, as technology has improved and become more available to everyone in the field, Photorealistic Renders have become a great new tool to help us Designers show our clients what their space will really look like.
In my next article I’ll be going more in depth into the 3D modeling and rendering tools that we use as designers. But first let's talk a bit about some of the other amazing digital tools that we have available to us to help us in sharing our visions with our clients. There are many types of tools and many options within each category, and many of the programs will cross categories. Hopefully this list will help you figure out what works best for you and your business.
As you read through my list, keep in mind that there are hundreds of programs and apps out there, and more are being developed every day. If you have a favorite tool that I haven’t mentioned, please feel free to leave a comment! I’d love to hear what you love working with!
(Please note, that I am not affiliated with any of these programs. My selections and comments on them are either from personal experience, or research on how others use these programs. Please always do your own research before committing to a program)

Drafting Samples from AutoCAD (by Kaza Interiors) & Home Designer
Drafting
Drafting is the art of laying out structural and construction drawings, usually to be used as plans and instructions for building and installations. These tend to be line drawings, set to scale and showing dimension lines to indicate the size and location of various elements. Good drafting tools, often referred to as BIM (Building Information Modeling), will give you the ability to place elements in very specific places and to print documents that can be shared with clients, contractors and installers. Often we use these tools to layout furniture placement, lighting & plumbing schedules and cabinet installations.
Auto CAD- one of the first systems to allow the creation of drafting documents, AutoCAD is almost a generic name - like Kleenex or Tylenol (CAD stands for “Computer Aided Design”). AutoCAD is still widely used in the industry and allows for extremely detailed drawings. Because it was originally created as a 2D drafting program for engineers, the program is very technical and many find it difficult to learn. There is a reduced version (AutoCAD LT) if you are not sure that you want to commit to the full AutoCAD system.
Revit- Revit is a drafting tool like AutoCAD, but it was developed more specifically for BIM design in a 3D space. It’s a great tool for creating documents and imagery for anything from simple room layouts, to full ground-up construction details.
Chief Architect/Home Designer - Chief Architect is a great program for Interior Designers. It has all of the ability to create the technical specifications and documents that AutoCAD & Revit does, but with a user interface that is much easier to learn. While Chief Architect is a full featured program, the company also produces a more restricted version labeled as Home Designer. This is a great tool for those that need to create floor plans, but don’t necessarily need the detailed construction documentation.
Sketchup Pro/Layout- While Sketchup is first and foremost a 3D Modeling program, it was designed with Interior Designers and Architects in mind. Creating accurate drawings (both 2D and 3D) is simple but open-ended. With the added application Layout (included in the Pro version) the printing of these documents is easy too. While the basic tools of this program are easy to learn and use, if you want more functionality it is often required to download add-on extensions. Many of these extensions are free, but some do require an additional fee.
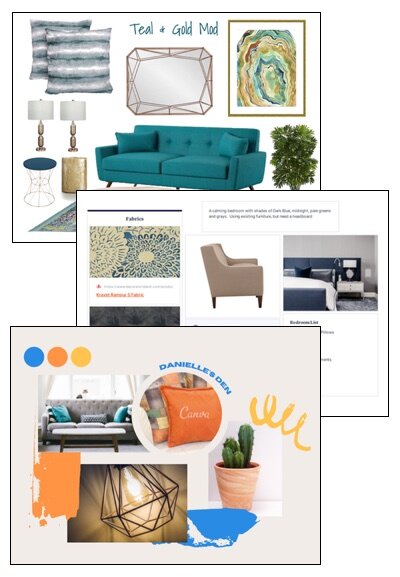
Mood Board Samples from Design Files, Milanote & Canva
Mood Boards
Mood Boards are a great tool to use to help a client understand your design vision. Mood Boards can also be referred to as Concept Boards, Sample Boards, or Design Boards - though many in the industry will argue (and rightly so!) that these each mean something different. The main idea behind them remains the same. Images of products or finishes are collected and placed in a pleasing layout to express a design idea to a client. Traditionally a mood board is created by collecting actual fabric and finish samples, photographs of pieces and other elements and arranged in a pleasing display for a client presentation. The digital versions do the same thing. Some of the tools are very open-ended and others are more structured. Choose a tool that gives you the flexibility and ease of use that is important to your workflow.
Photoshop- As a leader in the graphic industry, Photoshop is another one of those programs that has almost come to represent a generic term. Photoshop is a very powerful program. It’s often used for photograph manipulation and image creation, but as a tool for creating mood boards it’s also ideal. Photoshop gives you complete creative control over your images. Trim, cut, resize, recolor, add, subtract, layer- you can do anything to your products and finishes that suits your design. But, because it is so deep, the learning curve can be difficult for some. And if you are using it solely for mood board creation, there are many, many tools that you simply will never use.
Canva - Canva is a favorite among designers. It’s simple to use, has a ton of free templates and creates clean, easy to read images. The free version gets you access to a lot of great content, and you can add any of your own imagery. The biggest downside with this program is that because of the templates feature, after a while, you’ll notice that your boards look a lot like everyone else’s. But your clients won’t likely know this and for a free application it’s a great way to get your vision across and get buy-in on a project.
Design Files- Developed as a Mood Board system, Design Files has grown over the last few years into a full service design-oriented Project Management system. This is a cloud-based system that allows you to shop your favorite online stores, and use their Clipper extension to easily save products and then add those products to project-organized design boards. It does have some simple graphic tools (such as removing the background, and scaling and stretching), but you can’t do anything too custom. There are some basic room templates if you want to try to create some perspective images, and you can upload your own images. In my opinion, it’s the clipper that makes this program so easy & fast to use.
Milanote - This is also a free web-based app. Here you are creating blocks of imagery, lists, titles, to-do lists and descriptions. This tool is great when you need to share not only imagery, but maybe you’d like to add some functionality to your board. Because of it’s block format, it’s a little less artistic looking, but sometimes that’s just what you need.

AutoCAD Visualization by Kaza interiors

Home Designer Visualization by Patrick Street Interiors
Room Visualization
Ok, here’s where we start getting into complicated territory. Room visualization can mean many things to different people. For this purpose, I’m using this term to describe programs that give us a 3D view of a space. Many of the drafting programs will do this, though often with different degrees of detail. Some programs will create the room with specified walls, windows, furniture and finishes, but not be able to create detailed construction plans. Some will create Photorealistic Renders, others create Artistic Renders. All have their merits, and place in the industry, and it’s important to choose a program that gives you the results you are looking for, while keeping in mind the learning curve associated with the different programs.
Drafting Systems (Chief Architect, Revit, AutoCAD)- Most programs that we use as drafting tools also have the ability to provide 3D imagery as well. Simple “camera views” of our drafted projects offer a good, easy to read images of our 3D spaces. Some of these programs have Rendering Capabilities too - some more photorealistic, some more artistic.

Cloud Based Render by JB Artistry
Design Files - New to their system is a 3D room planner. It’s basic, but it does give you the ability to create a 3D space and then view that space from any angle. Design Files is constantly updating their systems, so as time goes on, I'm sure this system will improve as well.
Cloud-Based Render Systems (Coohom, Homestyler, Foyr)- These programs are the new rage in the Interior Design industry. Cloud based means that you are not storing any data on your computer, nor are you using your system to generate the photorealistic renders. Because these systems are relying on an off-site “rendering farm” (basically a collection of processors working together) they are able to run the complex, detailed processes to create photorealism in a few minutes, where traditional in-home processes usually take hours. This makes the process much more accessible to the average Designer (and also to the homeowner, if they are so inclined). It’s easy to create images, but the art here comes in adding in custom models and understanding textures and especially lighting, which can take some time to master.
3D Modeling Systems (Sketchup, Blender, 3D Studio Max, Maya)- 3D modeling programs are deep, powerful and open-ended. Because they are specifically designed for 3D manipulation, you are able to create screen-shots or artistic views from any angle, and generate completely customized scenes based on your needs. If you want to create photorealistic images, it is often (but not always - it depends on which program you are running) necessary to purchase additional programs or add ons for rendering. Learning the complex art of modeling, texturing and lighting can be a tremendous undertaking, but it’s a skill that is often applicable across platforms. Most Interior Designers aren’t inclined to invest the time to learn to use these programs for rendering when other tools are easier to use and often just as effective.
Hopefully this gives you a place to start in trying to select the right tools and software for your business and your way of working. Some tools have multiple uses, and some are specific to their niche job. Below, I’ve created a downloadable PDF which you can reference when doing your own research, to give you some guideline on where to start. As I mentioned before, please feel free to leave comments below if you have experience (either good or bad) with any of these tools, or let me know if you have a tool that you love that I didn’t mention. I love learning about new programs and products that help make the job of Interior Design more rewarding for both the designer, and the client.

Click to download PDF
And always - if you love the end result of any of these products, but don't have the time or desire to learn and use them yourself, let me know! I offer services that can help streamline your design business and take on some of the specialized tasks that you may need help with. Click the button below to see my services, or email me at jodi@jbartistrydesign.com to find out more about how I can help you!
*Special thanks to Kaza Interiors for providing some graphics to show visuals of AutoCAD workspace. You can see more of Karen’s amazing work at www.kazainteriors.com